Thursday, March 28, 2013

Peep experiment

The Baking Soda & Vinegar Peep Experiment

2K+

The Peep Experiments are in full swing & we are having fun coming up with ways to torture experiment on these hapless little marshmallow bunnies and chicks.
After our heated/microwave experiment we decided to experiment with some fizzy, bubble fun and see what effect baking soda and vinegar would have on our Peeps.
Here's What We Were Armed With:
Baking Soda
Vinegar
Bunny Peeps (yellow)

I used a cake baking dish to contain the fizz/bubbling and it worked well.
I did use a large tray underneath just in case but we didn't need it.
I set up a cup with baking powder and 1 cup with vinegar and the Lil Divas were free to sprinkle and pour as they wanted. As you san see, their motto is "more is better!" :)

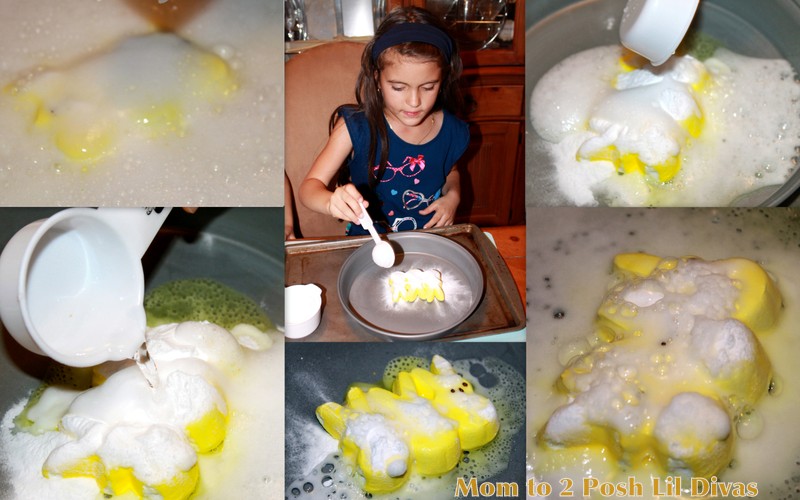
After lots and lots of baking soda and vinegar the Bunny Peeps were left pretty much intact. The only thing the Lil Divas noted was that the colorless vinegar had turned yellow. So, we know some color came off the Peeps but they looked pretty good. 

Then, the Oldest Diva asked if she could have some food coloring. I know she was thinking of our fun baking soda & vinegar experiment where I surprised them by adding some hidden food coloring.

The Lil Divas added food coloring directly onto the Bunny Peeps and then added in the baking soda and vinegar. It was a color explosion which was lots of fun to watch. She repeated it a few times and then I asked her to look over the bunny and see if it had been affected.  
The Bunny Peeps had some hints of food color here and there but you can see they were still pretty yellow. They felt squishy to the touch but were still pretty solid. 

Below, you can see a comparison of an unexperimented on Peep with some from the experiment. Not much of a difference in size or appearance considering the onslaught of baking soda, vinegar and food coloring. Resilient little bunnies! Not sure I can ever look at these guys the same anymore.  After seeing how resilient how they are, I just keep imaging them sitting in the Lil Divas bellies. :) 
This experiment gave me the idea for peep experiment #3 coming tomorrow. What will it take to actually dissolve a Peep? Join us tomorrow to see what we found out.

twenty five at home science expriements


25 At-Home Science Experiments

Posted by on June 4th, 2012 at 10:13 am
science 25 At Home Science Experiments
Now that the kids are almost on summer break it’s time to start planning those daily activities. My biggest predicament is trying to find activities that I don’t feel are completely mindless (gotta keep those synapses firing, right?). What better activity to do with them than a fun science experiment? Learn all about the crystallization process with geodes and test the power of nature by walking on eggshells. Your afternoons are guaranteed to be tons of fun and educational with these 25 At-Home Science Experiments…
Read more from Jacinda on Prudent Baby

Sensory bag for babies

Sensory Bag for Baby

Sometimes it's hard to come up with sensory play for babies, but I am so excited about this project!! I saw this post for sensory bags quite awhile ago and so wanted to do it. I just couldn't quite think of a way to modify for the babe. I was afraid as is, he would for sure be able to get the plastic bags open quickly. Then I saw this post from The Mommies Made Me Do It.  Hmmm....I had my answer...duct tape!

It couldn't be easier. All I used was a ziplock bag (I used a freezer bag thinking the material might be a little sturdier than a non-freezer plastic bag), some hair gel, duct tape, and a few things to put in the bag. I found these cute little frogs at the dollar spot at target. They were perfect! At first that's all I was going to put in it but I thought why stop there! I added a few buttons, some beads, silly bands, and a couple of flat marbles. You could use pretty much anything that won't poke a hole in the bag.


Fill the bag with hair gel. I happened to find cheap hair gel that was already colored,  had I not,  I would have just added food coloring to regular hair gel. Then, throw in some fun things for baby to look at and squish around in the gel.  Squeeze out as much air as you can when you seal the bag. I ran duct tape around all the edges to reinforce it. The duct tape added a little color and made it look kinda cool too (bonus) That's it! You are good to go!

I'm pretty proud of the frogs...don't they look like they are swimming in there?
We'll call it a frog pond sensory bag :)
At first Mr. C wasn't sure what to do with it. He would just look at it and smile. (at least he thought it was pretty).  Eventually he did get to squishing it around a bit.  He especially liked it when I held the bag up so the light would shine through. I'm thinking the next time I get it out I may tape it on our sliding glass doors so he can look at it and explore that way. Believe it or not, much to my surprise, he didn't try to put this one in his mouth.

This is by no means limited to the baby set. I think it would be well suited for a lot of ages. My older son was even intrigued with how I made it, what I put in it etc. If you have a large age gap between kids like we do, sometimes its fun to get the the older ones involved in making these types of things for the younger ones. It gives the older kids a project and everyone gets to participate. (I'm a big fan of older kids with projects).

I will definitely be repeating this one as the munchkin man gets older.  I'd also like to try making this in a smaller size. I think it would be easier for him to pick up and manipulate. With the hair gel in the gallon size bag it was a bit heavy for him so he was more limited to playing with it like a mat. For that reason I think it would have been great when he was younger and needed something to hold his interest during tummy time. Wish I had thought of it then, he hated tummy time.

Oodles of NOoDles!

Swim in OODLES of noodles with a Pool Noodle Bath Pit!  Simple & frugal fun that lends itself to tons of learning activities.  Build, sort, stack, order, graph, pattern, PLAY!

Microwave Kool-aid Play dough

Microwave Kool Aid Play Dough

We made play dough and love this recipe from Cassie's preschool! It says you can add a scent, but we used unsweetened kool aid for the scent and color of the play dough. I like the idea that it can be made using the microwave too.  We don't drink a whole lot of kool aid here, but have used it for homemade popsicles. Some of the flavors add a nice scent to the play dough too. I don't know if C was fond of all the scents, but it was a fun way to mix up the recipe a bit.
Here is the recipe:
(we divided it in half to make more colors)
2 Cups Flour
1 Cup Salt
2 Tablespoons Oil
4 teaspoons Cream of Tartar
2 Cups Water
Food coloring/Scent (We used unsweetened kool aid)

Mix all dry ingredients in a large bowl. Combine the oil and water in a microwave safe bowl until it is almost boiling.  Add the food coloring. (we did not add food coloring for color--- we added the kool aid  powder with the dry ingredients) Mix the liquid and the dry ingredients together. Once the mixture has cooled, knead the dough until it becomes smooth and soft.

Here are the flavors/colors of kool aid that we use for our kool aid play dough: Cherry, Orange, Lemonade, Lemon-Lime, Ice-Blue Raspberry Lemonade, and Grape. ***For the Lemonade color we use added a little yellow food coloring because it was so light. Grape is a little dark, but the scent is good.

Here is C mixing the dry ingredients and the Ice-Blue-Raspberry Lemonade powder for blue play dough.
Here is C carefully mixing in the wet ingredients! (Careful because it is HOT!)
After the play dough kool aid cooled, we knead the play dough and it was ready for playing!
Here are some play dough snails in each color with tooth picks and googly eyes added in! Cassie's favorite scent was the Cherry! This was the best, I agree!
Here are her play dough monsters and C found some popsicle sticks to add in to the FUN!

Kid Activities 2100+ free fun


2100+ Kid Activities from the PLAY group
Click on the images to take you to the full post.
………………………………………………………………….
Spring is the perfect time to get your kids excited about being outside.  As the weather warms, you will want to try these exciting Nature and Gardening activities.  You wont want to miss this amazing resource of over 200 outdoor activities.  It the perfect resource for a screen free fun!   nature and gardening activities
………………………………………………………………….
Spring is here and we are sure to have many rainy days ahead.  Check out this list of over 300 Rainy Day Activities perfect for your next indoor play day.  The best part is that the whole list is screen free!
………………………………………………………………….
Rainbows are a beautiful, vibrant and perfect way to teach, explore and play with  COLORS.  I am excited to share a HUGE list of rainbow crafts, activities, science, food, play and so much more all from the PLAY groupClick on the image to take you to the full post.
………………………………………………………………….
Below you will find a collection of over 1500 PLAY an LEARNING ideas all complied from the PLAY group ladies!
Click on the images to take you to the full post.
Recycled Crafts and Activities